Alrighty folks, if you’ve been following along with the High Performance WordPress post series you will by now have experienced the awesomeness of a WordPress website running on nginx. If you’ve not been following along what are you waiting for? Go check out the following posts first:
Today we’re going to sqeeze even more performance out of your trusty little VPS by configuring and tuning an opcode cache for php.
What is an Opcode cache?
PHP differs from languages like Java and the .net framework in that it is an interpreted language meaning that each time you call a PHP script, the server must first read the contents of the script and compile the logic contained within to code that the operating system can understand (which is the Opcode bit). This is all fine and dandy if you’re running a low volume website with very simple non-memory intensive application logic. As soon as you start to use more complex PHP applications like WordPress and then throw in a bit of traffic things tend to get slower – quickly. A lot slower in fact.
All this “just in time” opcode compilation puts a lot of strain on your server in the form of memory usage.
Enter Opcode Cache
When setup correctly (and correct setup is key) an Opcode Cache can significantly speed things up nicely. In a nutshell an Opcode Cache will load, parse and compile your PHP requests once and load them into memory (or disk) for reuse. The advantages to this should be immediately obvious – your server will not need to process load, parse and compile the same PHP requests every single time they are called – saving precious RAM and CPU cycles – which can translate to significant page load speed improvements.
Common PHP Opcode Cache Options
With PHP becoming ever more popular over the past few years, lots of different Opcode caching options have emerged. Here are links to some of the more predominant options:
Which Opcode Cache is best?
I’ve played with all 3 of these extensively and I always come back to APC. APC will at some point come out of the box with future PHP releases. It was also the Opcode cache of choice for frickin Facebook for a long time. (Although I think Facebook now uses Hiphop exclusively which also comes with an implementation of APC). You’ll see lots of debate about which one is best but APC is just dandy in my book and generally works really really well so let’s get on with the setup and configuration process.
APC Setup and Configuration
If you’ve been following along with our High Performance WordPress post series, the really good news is that I snuck in the APC installation back in Part 2. If you’ve not been following along – shame on you! The install process is still pretty straightforward:
[sourcecode]
apt-get install php-apc
service php5-fpm restart
[/sourcecode]
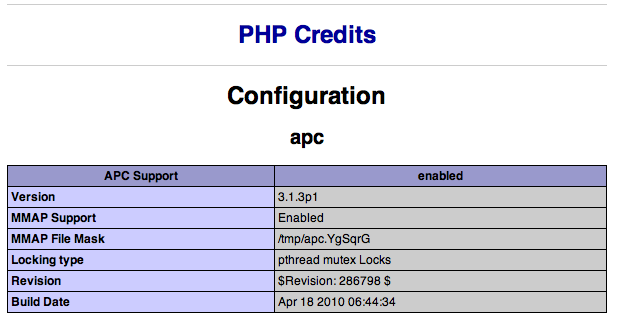
To check and see if you’re already running APC, load your trusty phpinfo page and look for this:

APC Tuning
Sometimes just installing APC is “good enough” to get you up and running but you really should tune it for your specific website to avoid degrading your websites performance. Thankfully APC has a nice little script which helps us see what it is doing and in turns helps tune APC accordingly.
Log on to your shell account and grab a copy of the APC diagnostic script and drop it into your web root as follows:
[sourcecode]
cp /usr/share/doc/php-apc/apc.php.gz /srv/www/mydomain.com/public_html/
cd /srv/www/mydomain.com/public_html
gzip -d apc.php.gz
[/sourcecode]
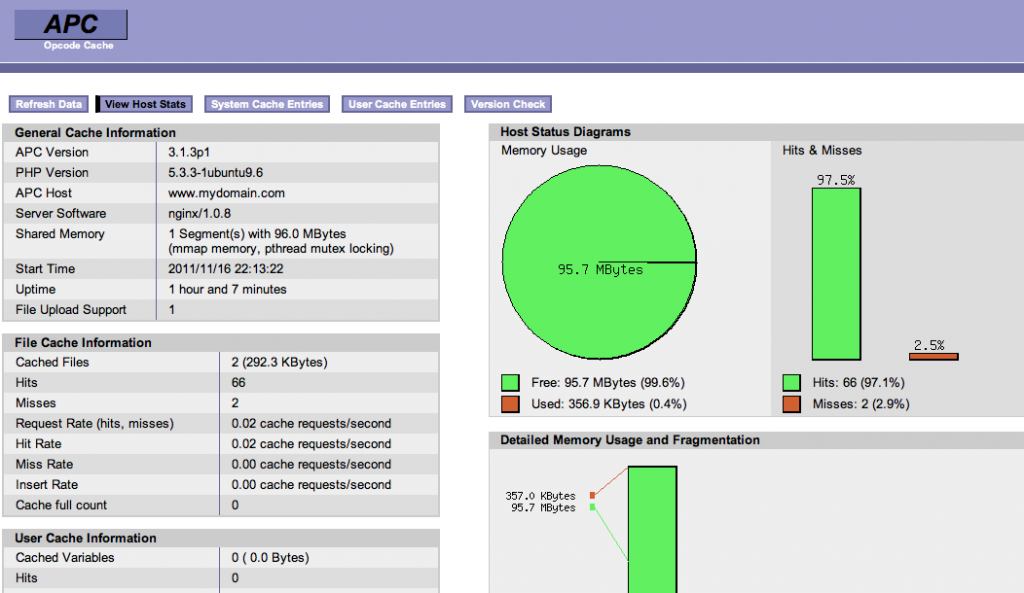
Go ahead and open apc.php (use nano apc.php) which should now be in your web root and set a strong password to enable the script. Then open mydomain.com/apc.php and you should see some lovely data like this:

Right now most of this will mean diddly squat – that’s ok! There are a few really really important things you need to fully understand to get the true benefits of APC.
- Memory (apc.shm_size) Size – The single most important thing to understand about how APC works. In a nutshell, APC will store your compiled PHP to RAM (or mmap memory most likely on most distros now). The default size of the memory block allocated to APC is 32 MB. I find this generally to be too low for your typical WordPress website. I generally bump this up to 96M or even 128M to start with. You might be ok with 32M but I wouldn’t risk it – especially if you have a bit of memory to spare. On my trusty 512M Linode I have allocated 128M to APC alone without any issues. Why is apc.shm_size so important? Well, if you leave it at the default 32M and the cache is filled quickly, it will most likely hit 100% memory usage in a very short space of time, at which point APC will dump the complete contents of the cache! When this happens all new incoming PHP requests will be re-compiled by APC and this will cause a memory spike in itself on your server. Moreover, if you’re constantly hitting high percentiles of APC memory usage it is likely your cache will become quite fragmented which will cause a bit of a performance degradation. If after a week or two you find at you’re never using more than 50% of your memory allocation you can always dial it back down. Just remember that if you add another new and separate WordPress install to your server you’ll need to bump it back up again. I generally assign 56M per site on my servers to be safe.
- Cache Hits & Misses – When a PHP request is served from your APC cache this is a HIT. When the PHP request must be loaded, parsed and compiled by PHP this is a MISS. When you first install APC and load your first few WordPress requests you will have more misses than hits – naturally as APC has never seen them before. But after a few more requests you’ll find your hits should start rising dramatically. Over time (after a day or two) virtually all PHP requests should be hits. For a typical stable WordPress website where you’re not chopping and change plugins, themes frequently, you should be getting high 90%’s for your hit ratio.
Once you understand these 2 fundamentals everything else after should be pretty straight forward. There is a lot of other fine tuning you can do to your APC install but your cache size and your hit ratio will be the main determinants of how effective APC is for your server.
I’ve included my typical APC config below. This config is used on a few nginx/php-fpm servers I’ve built out in the past couple of years that serve thousands of visitors per day with very healthy high 90%’s hit ratios and memory usage under 60% consistently.
To edit your APC config:
[sourcecode]
cd /etc/php5/conf.d/
nano apc.ini
extension=apc.so
apc.enabled = 1
apc.shm_segments = 1
apc.shm_size = 96
apc.optimization = 0
apc.num_files_hint = 4096
apc.ttl = 7200
apc.user_ttl = 7200
apc.gc_ttl = 0
apc.cache_by_default = 1
apc.filters = ""
apc.mmap_file_mask = "/tmp/apc.XXXXXX"
apc.slam_defense = 0
apc.file_update_protection = 2
apc.enable_cli = 0
apc.max_file_size = 10M
apc.stat = 1
apc.write_lock = 1
apc.report_autofilter = 0
apc.include_once_override = 0
;apc.rfc1867 = 0
;apc.rfc1867_prefix = "upload_"
;apc.rfc1867_name = "APC_UPLOAD_PROGRESS"
;apc.rfc1867_freq = 0
apc.localcache = 0
apc.localcache.size = 512
apc.coredump_unmap = 0
apc.stat_ctime = 0
[/sourcecode]
If you’re interested in what each of these values is for look no further than the main APC Runtime configuration docs.
That’s is for Part 4! In Part 5, we’ll be adding the final big layer or super charging for your server when we walk you through the process of setting up a Varnish Cache server to sit in front of nginx. Part 6 will then bring everything together when I walk you through our testing tools of choice for benchmarking server performance.
In the meantime your homework for this week (I would have loved if they taught this shit in school!) should be to tune your APC run time configuration for optimal memory assignment.
See you next week!
Ed

Leave a Reply